The VMware Labs flings monthly for June 2019

Wow there are already six months gone in 2019. Both my kids passed passed their schoolyears and this month there have been three new fling releases and four that have received updates. The new ones are: vSphere Mobile Client, Workspace ONE UEM SCIM Adapter and FlowGate. The ones that received updates are USB Network Native Driver for ESXi, HCIBench, IOBlazer and the Horizon DaaS Migration Tool.

New Releases

[sta_anchor id=”vspheremobileclient” unsan=”vSphereMobileClient” /]

vSphere Mobile Client

I already posted a short blog about this fling over here.

vSphere Mobile Client enables administrators to monitor and manage vSphere infrastructure directly from any mobile device. Whether you want to check on the current or historical resource consumption; you want to get notifications on long running tasks; or you want to check the currently running tasks – the vSphere Mobile Client is there to help.

Features

  • VM overview: Review the status of your VMs including state (powered on/off), resource usage and configuration information
  • VM management: Change the power state of a VM or restart it. Locating the virtual machine to operate on can be done through search.
  • Task monitoring: Subscribe to any running task and receive a notification on your mobile device upon task completion, even when your device is in-active or you have another application running on the foreground.
  • Performance charts: Monitor the resource usage of a VM in real time or a day, week, month or year back. Counters include CPU, Memory, Storage and Network.

NOTE: vSphere Mobile Client is currently available for Android and iOS devices and vCenter 6.0+ deployments. Check the “Requirements” tab for more details. Access to vSphere infrastructure may require a secure access method such as VPN on a mobile device.

This is a technical preview release and as such it only has a limited subset of the intended functionality. The team would be releasing updates with new features regularly, but our main task is to gather feedback so please do not hesitate to reach out to us.

[sta_anchor id=”wsonescim” /]

Workspace ONE UEM SCIM Adapter

Workspace ONE UEM SCIM Adapter provides SCIM user/group management capabilities to Workspace ONE UEM. The middleware translates the System for Cross-Domain Identity Management, SCIM, to a CRUD REST framework that Workspace ONE UEM can interpret. This capability allows Workspace ONE UEM to synchronize cloud-based identity resources (users/groups/entitlements) without the need for an LDAP endpoint (service to service model). Examples include Azure AD, Okta, and Sailpoint.

[sta_anchor id=”flowgate” /]

Flowgate

The Flowgate fling is all about linking IT & Facility systems with each other.

In enterprise data centers, IT infrastructure and facility are generally managed separately, which leads to information gaps. Collaboration between facility and IT infrastructure systems are limited or manual, and virtualization adds more complexity.

The goal of Flowgate is to make facility awareness in IT management system and make IT operations management and automation better on high availability, cost saving and improved sustainability, with more information on power, cooling, environment (e.g. humidity, temperature) and security.

Built-in adapter for multiple DCIM and CMDB system integration:

  • Nlyte
  • PowerIQ
  • Infoblox
  • Labsdb
  • IBIS(TODO)
  • Pulse IoT Center (TODO)
  • Open for other facility system integration

Built-in adapter for multiple IT stack systems:

  • vCenter Server
  • vRealise Operation Manager
  • Open for other IT stack integration. More systems will coming soon.


  • UI based Integration process: One click integration.
  • Role based access control: API level access control support.
  • RESTFul API support: Provide unified facility information querying services. APIs for all operations and data query make it easy to integrate with other systems.

Updated flings

[sta_anchor id=”usbesxi” /]

USB Network Native Driver for ESXi

Are you building an awesome homelab but received some funky USB Network adapters? The USB Network Native Driver for ESXi might just have the correct drivers for you.

Changelog

June 17, 2019 – v1.1

  • Added support for 9 additional USB NIC devices including USB 2.0 RTL8152 & TPLINK (see Requirements page for complete list)
  • Added support for Jumbo Frames (up to 4K) for RTL8153 & AX88179
    ESXi670-VMKUSB-NIC-FLING-24524132-offline_bundle-13958648.zip
    ESXi650-VMKUSB-NIC-FLING-24599816-offline_bundle-13964320.zip

[sta_anchor id=”hcibench” unsan=”HCIBench” /]

HCIBench

HCIBench is one of two benchmarking utilities that received an update.

Changelog

Version 2.1

  • Switched UI to dark theme
  • Redesigned VMDK preparation methodology, which can complete much faster using RANDOM on deduped storage
  • Added VMDK preparation process update
  • Added Graphite port check into prevalidation
  • Added vCenter/Host password obfuscation
  • Added “Delete Guest VM” button
  • Fixed Grafana display issue
  • Fixed FIO blank results issue
  • Bug fixes
    MD5 checksum of HCIBench_2.1.ova: d37e6f164ed962a6e7ccbe104ba9eaec

[sta_anchor id=”ioblazer” unsan=”IOBlazer” /]

IOBLazer

It looks like the IOBlazer fling was first released in 2014(!!!!) as a tool to benchmark all kinds of storage systems. Since I haven’t posted about it here yet let me give you the overview:

IOBlazer is a multi-platform storage stack micro-benchmark. IOBlazer runs on Linux, Windows and OSX and it is capable of generating a highly customizable workload. Parameters like IO size and pattern, burstiness (number of outstanding IOs), burst interarrival time, read vs. write mix, buffered vs. direct IO, etc., can be configured independently. IOBlazer is also capable of playing back VSCSI traces captured using vscsiStats. The performance metrics reported are throughput (in terms of both IOPS and bytes/s) and IO latency.

IOBlazer evolved from a minimalist MS SQL Server emulator which focused solely on the IO component of said workload. The original tool had limited capabilities as it was able to generate a very specific workload based on the MS SQL Server IO model (Asynchronous, Un-buffered, Gather/Scatter). IOBlazer has now a far more generic IO model, but two limitations still remain:

  1. The alignment of memory accesses on 4 KB boundaries (i.e., a memory page)
  2. The alignment of disk accesses on 512 B boundaries (i.e., a disk sector).

Both limitations are required by the gather/scatter and un-buffered IO models.

A very useful new feature is the capability to playback VSCSI traces captured on VMware ESX through the vscsiStats utility. This allows IOBlazer to generate a synthetic workload absolutely identical to the disk activity of a Virtual Machine, ensuring 100% experiment repeatability.

Changelog

Updates in IOBlazer 1.01:

  • Added configurable IO alignment
  • Increased the robustness of the trace file parser in the face of spurious lines
  • Increased the robustness of the build process by automatically detecting target OS and arch within the Makefile
  • In the Windows version, changed the raw access mode from volume to physical drive to avoid unnecessary mount/unmount operations at every test run.

[sta_anchor id=”daasmigtool” /]

Horizon DaaS Migration Tool

The Horizon DaaS Migration Tool is for the Horizon DaaS providers to migrate their customers to the latest version of Horizon DaaS.

Changelog

Version 2.1.0

  • Fix for the bug on “Requested Capacity” at the pool/assignment summary page showing inappropriate values.
  • Intelligently handling import of new VMs skipping previously imported VMs.

Runecast Analyzer: now with automated HCL checks in public Beta

DIsclaimer: I was asked to write this article but don’t gain any returns from. All tekst except for the quote are mine and my opinion.

Three years ago, at my very first VMworld I met a couple of guys at the infamous @cxi party that managed get a table in the up and coming vendors section. One of them was Runecasts very own Stanimir Markov and one of his co-workers to whom I want to apologize for not remembering his name. We had a great time over there and the product they where showing was simply awesome: The Runecast Analyzer. Since that time I always make time to meet them if possible and they have become great friends of the entire vCommunity.

While I haven’t blogged about Runecast yet (shame on me!) I have been following the product ever since. I loved the addition of the Horizon checks (remember me to log about it somewhere soon please!) and today they released Runecast Analyzer version 2.7 with automated HCL checks in public beta, a feature that was in private beta in version 2.6.

excerpt from the announcement:


Following on from our recent private beta we are delighted to release our new Automated VMware HCL functionality as a public Beta to our valued Customers and new users. With this release, Runecast Analyzer checks your servers for compatibility and verifies the I/O devices within them.

The Hardware Compatibility List: VMware Best Practice #1

The VMware Hardware Compatibility List (HCL) is the definitive human-readable resource used to verify whether your ESXi servers and their internal components are supported by VMware. Ensuring your vSphere data center complies with the HCL is considered a number one best practice throughout the professional community.

The HCL contains thousands of devices – it lists the tested and supported physical hardware together with the compatible software and firmware versions. Compliance with the HCL is essential, not only during the design phase and in greenfield deployments, but also throughout the whole lifecycle. The HCL is continually updated, as are server and component build versions. Keeping your environment compatible is complex and onerous, unless you deploy Runecast Analyzer to do it for you.

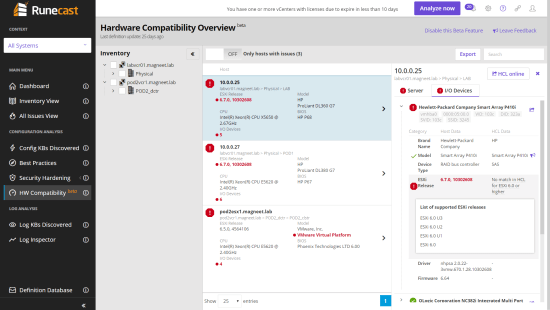
If you don’t know the Runecast Analyzer yet it is all about analyzing your environment, checking the log file and comparing it with the VMware knowledge base, best practices and security guidelines. Since my lab is NOT an example of following those things I have a whole lot of warnings to show you. The screenshots are still based on version 2.6 so some things might be changed in 2.7.

On the left side just under the middle you’ll see a menu item for HW Compatibility against the vSphere version it is running. Small disclaimer: the hardware in my homelab are HP Gen 7’s (and a gen 6 that isn’t connected atm) from the stone age. This is immediately visible when you open it. The count under I/O devices is not the amount of errors but the amount of I/O devices, something you’ll see later.

When I select one of the servers you get this screen showing some of the first issues.

I already pointed the team to the fact that this shows the hardware to be compatible up to 6.0u3 but also says that there is no match for vSphere 6.* or higher. While this might not be fixed in the 2.7 release it hopefully will be in the future. Now let’s select the I/O devices tab.

As you see it’s only the raid controller that is not on the HCL while the four NIC’s are still okay. It is possible to open the I/O item, so you can see more details about it and what versions are supported.

For me the Runecast Analyzer products is getting better and better and I will keep advocating them to my customers. Some already have their own matrices of software and hardware compatibility for for a lot this would be an excellent addition.

If you want to test the Runecast Analyzer yourself than please sign up over here: https://portal.runecast.com/registration vExperts get a special treatment so check vmtn for what to do or contact me for the details.


Small recap of the Belgian VMUG meet on 14-06-2019

Last Friday it was time for my annual trip tot he Belgian vmug meeting. I consider this my home vmug away from home and have been visiting for years. This was the first time I could give back in Belgium since Hans & mine session was accepted in the call for papers.

Our session

Right after the keynote (from which we sadly had to miss a couple of minutes to get setup) we did our presentation in front of about 22-23 people in the attick of the building. Just like at the Dutch vmug we did it about flings & tools for Vmware Horizon. Luckily we could do some of our demo’s locally because the wifi & 4G weren’t delivering a good speed to connect to our labs.One thing is for sure we did the session in the brightest manner ever.

If you are interested in the slidedeck we partially used you can find it here.

Other sessions

Firts of all the keynote by Joe Baguley was great as always. His vision on how things works or should be done has been evolving over the years but always seems to around the same lines. The 2nd keynote bij Johan van Amersfoor about VDI by day,compute by night wasn’t the first time I have seen this session but it’s so good that I don’t mind watching it several times.

The session about Kubernetes by Eric de Witte contained some usefull information since I haven’t done a whole lot with kubernetes yet. The last two sessions for me where Luc Dekens talking PowerCLI (what else?) and Valentin Bondzio about the computational cost of security. Luc’s session was about his style of coding and steps he takes to write codes plus a bit about working with instant clones.

Conclusion

During the day Hans and I had great fun with the people from EG Innovations and 10Zig in the exhibition area. As usual at the BE vmug the day ended with a great BBQ, those belgians do know their food! While not as big as the Dutch vmug UserCon the Belgian vmug meets are always high quality so I will beep going if my schedule allows me too and yes if needed I will take a PTO day for it.

5 things I will be looking forward to at VMworld

This year will mark my 4th (yes only 4) trip to VMworld. With San Francisco replacing Vegas I will return to Barcelona for what should be my ‘home’ VMworld since I live in the Netherlands. This post might look a bit like last year’s 5 vCommunity tips but hey, I love the community!

  1. vFootball

    Last year I took part in the first vSoccer at VMworld US and it looks like we might be organizing a vFootball in Barcelona as well, football being the correct name for the sport obviously. On Tuesday night after the vExpert party we went to an indoor sports center where we had 2 fields that we could use for approximately two hours. We had loads of fun in there despite one injured player (he headbutted a wall and had a nasty cut in his eyebrow) my fitness level was definitely not on par but I have started preparations for this year back in January.

  2. Presenting at the vBrownbag stage.

    Just like previous years I submitted a session for vBrownbag stage it will be about a couple of VMware flings for Horizon View. I thought I also submitted for a [Code] sessions but it seems like that was official sessions so I have no idea yet about the status of that. If you think you can fill a 10-12 minute (a bit less is acceptable as well) with something even a bit related I advise you to sign up over here).

  3. Hackathon

    I have no idea yet if I will be forming my own team. If I don’t I will definitely be joining another one in having a night of great fun. It doesn’t matter if you have coding experience, just join a team when signups are opened and I can guarantee that you will learn something new.

  4. Meeting up with old and making new friends.

    One of the best things about the vCommunity is having contact with each other over the interwebz. It even gets better when you can meet in real life for the first or the gazillionth time. I don’t care if it’s in a session, while waking up with a coffee or at a party with beer in hand I always have fun talking to people. The subject doesn’t really matter, it’s all about connecting with people.

  5. learning new things

    While I take it easy with my session schedule I always look to learn new things. This could be either in the Hands-on Labs, Instructor led labs, Solutions Exchange, vBrownbag, {Code}, regular session or someone from point 4. Knowledge gaining for me doesn’t need to be tech per se. Learning how people engage customers or projects is very interesting to me.

New fling: mobile vSphere management

Every once in a while there’s a fling that looks too good to only be mentioned in my monthly updates. The vSphere mobile Client is one of those in my opinion. For years and years I have seen questions about apps to manage vSphere from your mobile device and there indeed have been a couple in the past. With the amount of available API’s some VMware engineers now have decided on creating a fling for it. Currently it’s only available for Android devices but it is an awesome step in the right direction.

vSphere Mobile Client enables administrators to monitor and manage vSphere infrastructure directly from any mobile device. Whether you want to check on the current or historical resource consumption; you want to get notifications on long running tasks; or you want to check the currently running tasks – the vSphere Mobile Client is there to help.

Features

  • VM overview: Review the status of your VMs including state (powered on/off), resource usage and configuration information
  • VM management: Change the power state of a VM or restart it. Locating the virtual machine to operate on can be done through search.
  • Task monitoring: Subscribe to any running task and receive a notification on your mobile device upon task completion, even when your device is in-active or you have another application running on the foreground.
  • Performance charts: Monitor the resource usage of a VM in real time or a day, week, month or year back. Counters include CPU, Memory, Storage and Network.

NOTE: vSphere Mobile Client is currently available for Android devices and vCenter 6.0+ deployments. Check the “Requirements” tab for more details. Access to vSphere infrastructure may require a secure access method such as VPN on a mobile device.

This is a technical preview release and as such it only has a limited subset of the intended functionality. The team would be releasing updates with new features regularly, but our main task is to gather feedback so please do not hesitate to reach out to us.

There are some screenshots on the fling site and the one below from my phone but once I am able to connect to my lab I will add some more.

The VMware Labs flings monthly for May 2019

Originally I created this post with only 2 updated and one new fling. Some engineers though added two more new flings so 3 new ones and 2 have received an update. The new ones are the Distributed Trust Incident Reporting fling, vRealize Build Tools and Cloud Automation Services SDK for Python. while the Horizon Toolbox and Horizon Migration Tool have received updates.

New Releases

[sta_anchor id=”vrealizebuildtools” /]

vRealize Build Tools

vRealize Build Tools provides tools to development and release teams implementing solutions based on vRealize Automation (vRA) and vRealize Orchestrator (vRO). The solution targets Virtual Infrastructure Administrators and Solution Developers working in parallel on multiple vRealize-based projects who want to use standard DevOps practices.

This Fling is focused on code quality, code reusability, unit testing, dependency management and parallel releases of vRealize projects. In practice, it is a set of Maven extensions, packaged in a Maven repository format, that support the use of IDE (via Maven) and CLI to develop, test and deliver vRA and vRO-based solutions. It includes a vRO plug-in that exposes autocomplete information for standard and third-party scripting objects and actions and CLI that can deploy packages to vRO and vRA via the standard APIs.

[sta_anchor id=”cassdkpyth” /]

Cloud Automation Services SDK for Python

The Cloud Automation Services SDK for Python is a set of Python classes to simplify automation against several aspects of the Cloud Assembly, Service Broker, and Code Stream API when using Python.

Note: The github repo will be public soon!


[sta_anchor id=”dtir” /]

Distributed Trust Incident Reporting

The Distributed Trust Incident Reporting fling is an  open source security incident tracker.

Security incidents are important to track so that all parties know the status of a breach and can respond in concert and with appropriate speed. Current methods to track incidents are generally paper-based manual processes. More recent systems are based on a centralized database with some web interface to interact with the record and response tracking.

We propose that this does not work well enough in the scenarios where:

  • security incidents may affect more than a single entity
  • where more than one entity must respond to an incident
  • some or all entities have no trust in the others
  • no party can or will be responsible for hosting the full system

For example, a security breach in the supply chain for a food manufacturer could result in several retail businesses with products on shelf that contain a pathogen. Current methods of notifying the proper authorities require a phone tree to call all the correct parties which then react as individuals or local committees. In addition the incident must either be initially submitted to each entity separately or one entity must take responsibility to notify the others.

This Fling:

  • allows all parties (e.g. retail, governmental, public) to see the incident via a single report transaction
  • allows all parties to respond in concert as required
  • allows automated systems to report incidents
  • allows transparency across all organizations

Updated flings

[sta_anchor id=”horizontoolbox” /]

Horizon Toolbox

The Horizon toolbox is an extension to the Horizon Admin Console giving all kinds of user and session information. It is no replacement for the Horizon Helpdesk (or the fling).

Changelog

May 28, 2019, 7.8.0

  • Fix some incompatible issues
  • Only support Horizon View 7.7 & 7.8

[sta_anchor id=”horizonmigtool” /]

Horizon Migration Tool

The Horizon Migration Tool helps you migrating from Citrix to an On-Prem Horizon Environment.

Changelog

Version 3.0.2

  • Updated the binary package and the document accordingly

[API’s] Getting session counts (incl performance comparison)

One of my customers asked the question if it is possible to get a quick sessioncount for a script that they can run very often for a correct logging of license usage. While this could easily be done by grabbing all the sessions I thought this could be a slow process. I remembered though that the first release of the vmware.hv.helper module had a function called get-podsessions that only returned a sessioncount. I decided to see what was used for this. By going back in time at github I found that the GlobalSessionQueryService was still used but with the GlobalSessionQueryService_GetCountWithSpec method. It needs the service and a spec of the type VMware.Hv.GlobalSessionQueryServiceCountSpec.

the spec itself can hold one of the many options to get a count for

As you can see there is a globalentitlement property that needs to be set using the id so let’s grab that one first.

$queryService = New-Object VMware.Hv.QueryServiceService
$defn = New-Object VMware.Hv.QueryDefinition
$defn.queryEntityType = 'GlobalEntitlementSummaryView'
$globalentitlements = ($queryService.QueryService_Create($Services1, $defn)).results

I will use the first globalentitlement to grab the sessioncount

$globalentitlement=$globalentitlements | select -first 1
$globalsessionqueryservice_helper = New-Object VMware.Hv.GlobalSessionQueryServiceService  
$count_spec = New-Object VMware.Hv.GlobalSessionQueryServiceCountSpec  
$count_spec.globalentitlement=$globalentitlement.id
$sessioncountperglobalentitlements=$globalsessionqueryservice_helper.GlobalSessionQueryService_GetCountWithSpec($services1,$count_spec)

As you can see we actually get a count per pod so to get all the counts from all pods from all globalentitlements I have created a script with a couple foreach’s.

$hvserver1=connect-hvserver SERVERNAME
$services1=$hvserver1.extensiondata
$queryService = New-Object VMware.Hv.QueryServiceService
$defn = New-Object VMware.Hv.QueryDefinition
$defn.queryEntityType = 'GlobalEntitlementSummaryView'
$globalentitlements = ($queryService.QueryService_Create($Services1, $defn)).results
$queryservice.QueryService_DeleteAll($services1)
$sessioncount=@()


foreach ($globalentitlement in $globalentitlements){
  $globalsessionqueryservice_helper = New-Object VMware.Hv.GlobalSessionQueryServiceService  
  $count_spec = New-Object VMware.Hv.GlobalSessionQueryServiceCountSpec  
  $count_spec.globalentitlement=$globalentitlement.id
  $sessioncountperglobalentitlements=$globalsessionqueryservice_helper.GlobalSessionQueryService_GetCountWithSpec($services1,$count_spec)
  foreach ($sessioncountperglobalentitlement in $sessioncountperglobalentitlements){
    $pod=$services1.pod.pod_get($sessioncountperglobalentitlement.id)
    $sessioncount+= New-Object PSObject -Property @{
      "Global_Entitlement_Name" = $globalentitlement.base.displayname;
      "Pod_Name"=$pod.displayname
      "Pod_Sessioncount" = ($sessioncountperglobalentitlement | select-object -expandproperty count);
      "Site_Name"= ($services1.site.site_get($pod.site)).base.Displayname;
    }
  }
}
 return $sessioncount | select-object Global_Entitlement_Name,Pod_Name,Site_Name,Pod_Sessioncount

The W10_MGMT global entitlement only has a pool in pod1 so even though the pod doesn’t have a pool inside the global entitlement it will still return a sessioncount.

Performance

I also decided to time it but in my small environment it took 3 seconds and 3 of those where for connecting to the connection server. If I removed the connecting part it was 0.7 seconds.

Measure-Command {D:\scripts\dev\session_count.ps1}

Back at the customer I decided to compare this against dumping all global sessions, this will give some better data since it has a couple more sessions in it (around 3500 at the moment of testing)

The script I used for getting all global sessions is the code that I used for the get-hvglobalsession in the vmware.hv.helper module

$query_service_helper = New-Object VMware.Hv.GlobalSessionQueryServiceService
$query=new-object vmware.hv.GlobalSessionQueryServiceQuerySpec

$SessionList = @()
foreach ($pod in $services1.Pod.Pod_List()) {
  $query.pod=$pod.id
  $queryResults = $query_service_helper.GlobalSessionQueryService_QueryWithSpec($services1, $query)
  $GetNext = $false
  do {
    if ($GetNext) { $queryResults = $query_service_helper.GlobalSessionQueryService_GetNext($services1, $queryResults.id) }
    $SessionList += $queryResults.results
    $GetNext = $true
  } while ($queryResults.remainingCount -gt 0)
    $query_service_helper.GlobalSessionQueryService_Delete($services1, $queryresults.id)

}
return $sessionlist

Screenshots from the timing:

so the getcountwithspec method is about 2.5 seconds faster but the data in the globalsession is way more extensive and usable for all kinds of management overviews.

[API]Resetting Desktops

This is the first post in a series of shorts that I will be posting about various methods that you can use with the VMware Horizon API’s. This time it will be about resetting desktops. When looking at the API Explorer you’ll see that there are two ways do do this from the machine service.

So the first is for a single VDI desktop and the latter for multiple.

First we need to get a list of vm’s I will be using the machines in pod1pool02 as victims for this post.

$queryservice=new-object VMware.Hv.QueryServiceService
$defn=New-Object VMware.Hv.QueryDefinition
$defn.QueryEntityType="MachineNamesView"
$filter=new-object VMware.Hv.QueryFilterContains
$filter.MemberName='base.name'
$filter.Value="Pod1Pool2"
$defn.filter=$filter
$results=($queryservice.QueryService_Query($services1, $defn)).results

with this result:

From this we’ll make a variable with all of them and one with a single one

$singlevm=$results | select-object -first 1
$multiplevms=$results

Before I will reset the single VM I will show the state of all the vm’s.

($queryservice.QueryService_Query($services1, $defn)).results.base.basicstate

And now let’s reset the vm.

$services1.machine.machine_reset($singlevm.id)

Since this is an instant clone you’ll see provisioned and not reset. Now let’s reset the rest as well.

$services1.Machine.Machine_ResetMachines($multiplevms.id)

And this method will work for all managed vdi desktops full, linked or instant clones.

The VMware Labs flings monthly for April 2019

It has been a quiet month for me on the blogging side of things. I am slowly rebuilding my lab so that costs a lot of time that I can’t spend on blogging. This month two new flings have been released and no less than six have received an update. the new flings are MyVMware CLI and App Volumes Entitlement Sync. The ones to receive an update are App Volumes Toolbox, Workspace One UEM Workload Migration Tool, Cross vCenter Workload Migration Utility, Identity Manager Migration/Backup Tool, vSphere HTML5 Web Client,  and HCIBench.

New Releases

[sta_anchor id=”myvmwarecli” /]

MyVMware CLI

The MyVMware CLI fling is an early preview of api’s to download your entitled software from http://my.vmware.com.

MyVMware CLI is a command line client used to login and interact with my.vmware.com.
It provides an interface for programmatic query and download of VMware product binaries.

This Fling is in early preview and allows you to find and download:

  • Every product
  • Every version
  • Every file

Note: Any download attempts will be restricted to the entitlements afforded by your my.vmware.com account.

[sta_anchor id=”appvolsentsync” /]

App Volumes Entitlement Sync

If you have multiple App Volumes installations than the App Volumes Entitlement Sync fling can be usefull to make sure everyone has the same rights everywhere.

The App Volumes Entitlement Sync Fling will read, compare and sync entitlements from one App Volumes instance to another. This helps customers managing multiple App Volumes instances across one or multiple geographic sites.

Updated flings

[sta_anchor id=”appvolumestoolbox” /]

App Volumes Toolbox

The App Volumes Toolbox fling makes it easier to manage your App Volumes setups.

Changelog

Version 2.0

  • Optimized for App Volumes 2.x
  • Remove support for Enzo and App Volumes 3
  • Bug Fixes

[sta_anchor id=”wsonemigtool” /]

Workspace One UEM Workload Migration Tool

The Workspace One UEM Workload Migration Tool fling allows you to easily migrate applications and configurations between various WS One setups.

Changelog

Version 1.0.1

  • Fixed issue with expired credentials.

[sta_anchor id=”xvcentermigutil” /]

Cross vCenter Workload Migration Utility

The Cross vCenter Workload Migration Utility allows you to vmotion or move vm’s between linked and unlinked vCenter servers. Since this version it also supports NSX-T Opaque networking.

Changelog

Version 2.6, April 15, 2019

  • Added support for NSX-T Opaque Network (enables migration to/from VMC and on-premises vSphere with NSX-T)

[sta_anchor id=”idmmigtool” /]

Identity Manager Migration/Backup Tool

With the Identity Manager Migration/Backup Tool you can automate the process of migrating and backing up from one idm to another.

Changelog

Version 1.6

  • Exports categories to new XML file appname_categories.xml
  • Exports entitlements to a new XML file called appname_entitlements.xml
  • Imports categories
  • Creates the category if it doesn’t exist on tenant where importing
  • Shows if a bundle has an associated entitlement or category xml file
  • Shows number of applications returned
  • Shows number of categories an application has assigned to it
  • Windows reserved characters are replaced with an underscore for export bundle

Version 1.5

  • Allows more than 20 applications to be returned – now up to 500 applications will be returned by the tool
  • Added number of applications returned into the group box title

[sta_anchor id=”html5webclient” /]

vSphere HTML5 Web Client

Want the newest even with vCenter 6.7? Use the vSphere HTML5 Web Client fling!

Changelog

Fling 4.2.0 – Build 13172979
New Features

  • vSphere Perspective Management available under Administration > Customization > Perspectives This new feature enables administrators to take control of which parts of the UI other administrators see. This is done by defining a set of views and combining them together into a so called “perspective”.
    • [Perspective tab] As an administrator you can show or hide: tabs, portlets and primary views.
    • [Assignments tab] Perspectives can be assigned to both users and groups.
    • Demo is available at https://www.dropbox.com/s/06z15xspsvrciys/Perspectives-demo-fling.mp4
  • Code Capture can also capture calls for operations made when managing Content Libraries.
  • Code Capture can generate scripts in additional languages: Python and vRO (vRealize Orchestrator) Javascript.

Known Issues

We noticed an intermittent issue with stopping the vsphere-client. You can always kill the process manually by running these commands

ps -ax | grep java
kill -9
ps -ax | node
kill -9

[sta_anchor id=”hcibench” unsan=”HCIBench” /]

HCIBench

Want to test your Hyperconverged Infrastructure? HCIBench Is one of the tools you can use for that.

Changelog

Version 2.0

  • Added fio as an alternative workload generator
  • Added Grafana for workload live monitoring
  • Switched UI to clarity
  • Allow user to select one to four cases while using easy-run

Bug fixes

  • MD5 checksum of HCIBench_2.0.ova: ba3c2b06b8c27fb41a1bb68baedb325f

Installing Fortinet Fortigate VMX with VMware NSX-V

Recently I had to do an installation of Fortinet Fortigate VMX 6.* on a small cluster that already was running NSX. Since there is hardly any documentation on it besides an older pdf from Fortinet I decided to document my own following of that document.

Since my lab’s still on 6.5 I decided to do everything within the flash client of vCenter.

Disclaimer: I am not a Networking or Security professional so there’s a good chance I am not keeping to some standards in those worlds.

What you need

  • both Fortigate vmx ovf files with vmdk’s for version 6.*
  • Webserver with anonymous access for the deployment of the security vm’s
  • NSX already pre-installed

Setting up the VMX Manager

First you start with deploying the VMX Service Manager from vSphere. It’s important that note that there are two ovf files. One for the Service Manager and one for the Security VM. You need the FortiGate-VMX-Service-Manager.ovf first. During this deployment you need to select two networks. One for management and a sync network. The latter is for communication with the security vm’s only so can be non-routed. It is possible to have a dhcp server running in this vlan as long as it doesn’t provide a default gateway (Servers don’t like multiple gateways. capiche?). For the security vm’s the service manager is able to act as dhcp for the security vm’s. Since I use this vlan for more things I have dhcp running on my domain controller but will set a static ip on the service manager.

When the deployment has finished you can power the VM on and you need to open the console for some commands. Please note that I added the extra end’s to the commands compared to the manual.

Somehow they put the ip config in the ovf but that doesn’t work so you need to set it manually

config global
config system interface
edit mgmt
set ip <IP address for the MGMT interface > <subnet mask>
set allowaccess ping https ssh http
end
end


Now we need to configure the default gateway

config vdom
edit root
config router static
edit 0
set device mgmt
set gateway <IP address of gateway>
end
end


and configure dns ( I only have 1 dns host)

config global
config system dns
set primary <IPv4 address of DNS server>
set secondary <IPv4 address of DNS server>
end
end


So the basic configuration has been done and we should have access to the web interface by now. Just regular https on port 443. Default is admin without password.

If you want you can change the password now (recommended!!)

You’ll see a dashboard similar to this but with an evaluation license.

If you click on FGTVMX License you’ll get a button to install the license.

Click on upload and click ok to install the license, the VMX Service Manager will reboot after this.

With this done we need to set some default settings under Global > System > Settings

Since I only have my Domain Controller for ntp I need to do this from the CLI

config global
config system ntp
set type custom
config ntpserver
edit 0
set server <IPv4 address of NTP server>
end
end
end

and the result

Connecting with NSX

Here we find one of the bigger changes with the manuals of the 5.* releases of Fortigate VMX.

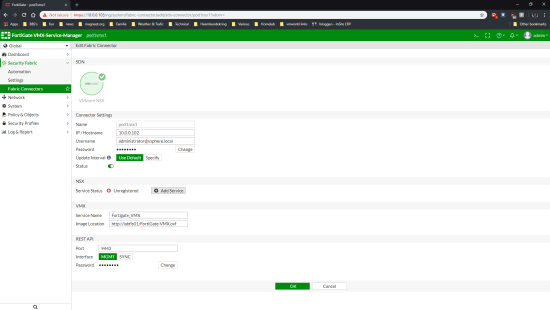
The 6.* releases of Fortigate VMX already come with the NSX service installed so the only thing we need to do is register the VMware NSX SDN. This can be done under Global>Dashboard>Security Fabric> Fabric Connectors.

Fill in all the fields, the image location has to be an anonymous 🙁 webserver that has both the vmdk files and the ovf. Click on ok when you are done.

Now we need to edit the connector again to register the service. Select the NSX Connector and click on edit.

Hit the Add Service button and the service will be created for you (previously this had to be done from the cli)

If you now go to the Service Definitions in NSX it will show an Extra one called Fortigate_VMX or whatever you named it.

Configuring NSX for Fortigate VMX

Next thing to do is to create a service deployment. Click on add on the Service Deployment tab under Networking & Security > Installation and Upgrade.

Select the Fortigate service name

Select the cluster where you want to deploy Fortigate VMX

Select the datastore where the Service VM’s need to be placed, the correct portgroup and if you want to use dhcp or an ip pool for the service vm’s.

and finally click finish

NSX will now start deploying the service vm’s. Usually it creates a new resource pool for these but that somehow failed for me.

Next up is creating Security groups for the vm’s that we need to firewall. This is done in the service manager for NSX.

Click add

Choose a name

Choose a rule for when vm’s are a member of this group

I didn’t use the next 2

And hit finish

The group now consists of several of my VDI Desktops

Last but not least we need to create a redirection policy.

Under service composer > security policies click add

Choose a name

skip Guest introspection and firewall rules. Under Network Introspection click add

Choose a name and select the direction of the traffic that gets filtered within the group where this gets applied.

I created two service for all incoming traffic to my security groups and all outgoing.

click next & finish.

Now click on the newly created security policy

click Apply

Select the security group where you want to apply the policy, put it in selected objects and click apply.

With this traffic should be redirected to Fortigate VMX and the firewalling can be setup over there.